Upgrading a laptop’s hardware isn’t as easy as for a desktop, simply because there isn’t much room to work around. But replacing the memory modules, hard disk or optical drive is fairly straightforward. Memory has been quite cheap for a while and is the most cost effective way to boost your PC’s performance. Solid state drives (SSD) offer numerous benefits compared to traditional disk-based drives, but at a significantly higher cost. However, over the past six months SSD prices have steadily drifted lower and are now at a very affordable level. Some of the highly rated 128GB SSD’s, such as Samsung 830 and Crucial M4, are often on sale for under $100. The one I got is a 240GB SanDisk Extreme, which also has great reviews on Amazon and other places. The optical drive, usually a DVD burner, may be upgraded to a Bluray burner or even replaced with a second hard drive. However, I’m not planning to replace the internal optical drive anytime soon and if a need arises later on, I’ll just use an external one.
5. Prepare SSD
SSD has been a hot topic in the tech world so there are plenty of guides on the internet on how to prepare and maintain solid state drives. Here is one, another one, and yet another one. They are very useful but can be over complicated for my case: I simply don’t need data migration, disk cloning or things like that. After reading through many informational articles and forum discussions, I only did a few things to my SSD:
- Update firmware. This is considered a necessary step even though it carries some risks (anytime you flash firmware something could go wrong, although unlikely). This is particularly important if your SSD has some known issues that have been reportedly fixed by new FW – all this information can be found online by searching for the specific model of your drive. To upgrade firmware, I downloaded and installed the SanDisk SSD toolkit. By putting my SSD in an external enclosure
and connecting it to my old PC, I was able to examine the SSD using the toolkit. It turned out there was indeed a new version of firmware released just a few days after my specific SSD was built. So I went ahead and saved the new FW into a USB flash drive – the toolkit would then make it a bootable drive. Still on my old PC, I changed the BIOS boot priority to USB. Upon restart, the software found the SanDisk SSD and completed FW update in just a few minutes. For more information on this particular SSD, here is a very detailed benchmark report.
- Change BIOS settings. There is an overwhelming amount of discussions on whether the BIOS SATA mode should be AHCI or IDE for SSD. My takeaway is that I want AHCI. I entered the new laptop’s BIOS settings (hit F1 when the welcome screen shows up) and confirmed it was indeed in AHCI mode. While there I also changed the boot order to the DVD drive.
- The Lenovo L412’s motherboard only supports SATA II (3GB/sec) while the SanDisk SSD is capable of SATA III speed (6GB/sec), but it is backward compatible and I doubt I’ll be disappointed. In any case it should outperform my current HDD by a mile!
- Windows 7 supports TRIM natively, which is important for maintaining SSD’s peak performance. Just to double check, I ran the command “fsutil behavior query DisableDeleteNotify” in a CMD window and made sure the returned result is 0 (meaning TRIM is enabled). This should be done after re-installing Windows 7, by the way.
- I didn’t partition the SSD and will simply use it as a large C: drive for all my programs. Important documents will also be stored on this drive but non-essential files, especially those used less frequently, will either stay on a temporary external HDD or the NAS.
6. Replace HDD with SSD

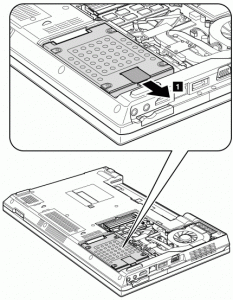
It is now a good time to load the bootable Windows 7 installation in the DVD drive. Then, shut down the laptop, disconnect the power cord, and remove the battery. Lenovo has hardware removal and installation tutorials, including short videos, to show you what to do. Basically, you first loosen the 7 screws securing the thermal cover. Then carefully lift the cover off, which may require a bit of wiggling due to the plastic tabs. The hard disk drive is located at the corner under a shiny metal protective plate. Detach the HDD from the connector and take it out of the system. Remove the metal cover from the HDD (4 screws) and install it onto the new SSD.
Now to install the SSD in reverse order. The original Hitachi hard drive Lenovo installed is 7mm high, which makes me really nervous because the SanDisk SSD I bought is 9.5mm. But it fits perfectly.
7. Upgrade Memory
Before putting the thermal cover back on, it is a good time to replace the memory modules. Unfortunately the one I bought, a Crucial 8GB Memory Kit (4GBx2), hasn’t arrived yet. So I’m going to have to do this one later.
The L412’s motherboard has two DIMMs and supports up to 8GB of RAM. The correct type is 1333MHz, 204-pin SODIMM, DDR3 PC3-10600 (some may be named 10660 or 10666). Crucial website has a neat Memory Advisor that suggests what type of memory fits your system, or scans your computer and provides a list of compatible memory modules.
In theory, it is possible to install a single 8GB memory stick in one of the DIMMs. However, this way the system is forced to run in single-channel mode and performance wise isn’t as good as running 2x4GB in dual-channel configuration.


1 thought on “Set Up a New PC Part II: Install Hardware”