Section 3: Wireless Connection
Both Foscam cameras offer IEEE 802.11b/g connectivity. If your router has wireless N, it is backward compatible to B/G. Newer generations of 8910 models provide B/G/N connectivity, which is even better. In order to establish wireless connection to the Foscam cameras, you must first find some key information about your wireless network.
- Log in to your router. This is usually done by entering the router’s IP address into your browser. If you didn’t change the factory default login information (you really should), you can go to the manufacturer’s website or your user manual to find the default user name and password.
- If you don’t remember the router’s IP address, try find your home network’s Default Gateway which in most cases will be your router’s IP address.
- In the router’s control panel, find something like Wireless Settings.
- Make note of your SSID, encryption method, encryption technique and share key (password).
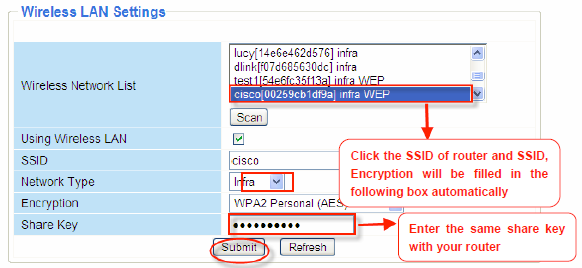
- With your Foscam still connected to you PC through Ethernet, go to Wireless LAN Settings in Device Management.
- Check Using Wireless LAN.
- If your wireless network is set up to broadcast its SSID, you will see it in the list after running a scan. Simply click on it and the SSID and Encryption will be filled in. Manually enter your Share Key and hit Submit. If you choose to hide your SSID for extra security, you can enter all the information manually in the boxes below. For Network Type, Infra is more common than Ad-Hoc.
- Once the camera finishes rebooting you can remove the network cable.
- Use the Foscam Camera Tool or your router’s device list to find its new IP address, and log back in. You can re-assign a static IP address if you prefer.
- Now your Foscam camera is connected to your home network wirelessly.
My router is an ASUS RT-N16, running the open-source Tomato USB firmware. There is a very active community on the internet dedicated to the development of Tomato. Along with a powerful router like the RT-N16, it is a dream system. The wireless network is extremely stable and signal is fairly good even at the far corner of the house. For the outdoor camera, however, depending on its placement the wireless signal may not be strong enough. In this case a WiFi signal booster would solve the problem. I use a Belkin N300 Dual Band Wireless N Range Extender
and so far it has worked really well.
- Section 1: Overview
- Section 2: Basic Configurations
- Section 3: Wireless Connection
- Section 4: Motion Alarm
- Section 5: Remote Access
- Section 6: Access from Smartphone


4 thoughts on “How to Set Up Wireless IP Cameras for Home Security: Wireless Connection”