Section 2: Basic Configurations
The Foscam cameras rely on a web-based interface to change basic configurations and it is fairly easy to use. Although there may seem to be many steps, most of them are straight forward. Fundamental security measures are implemented here. This is also the place to fully test your camera before installation.
The process outlined below is nearly identical for both indoor (Fi8910W) and outdoor (Fi8905W) cameras. To avoid having to constantly block out my personal information, I’ll use some images from Foscam’s user manual for illustration purposes. These user manuals come with the camera on a CD in PDF format, and are very detailed and helpful.
- Install the IP Camera Tool (IPCamSetup.exe or IPCamera.exe) that comes with the camera on a CD. This is not really necessary since you can find the camera from your router’s device list, but it is easier to use this way.
- Connect the external antenna to the camera.
- Plug the network cable (included) into the back of the camera and plug the other end into your router. Even if you intend to use WiFi in the future, setting up the camera must be done through Ethernet.
- Power on. It take about 30 seconds for the camera to start up.
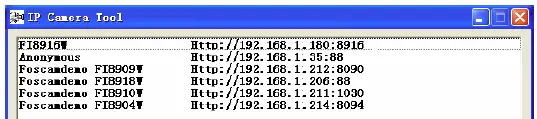
- Start the IP Camera Tool and if everything works well, you should see a camera named Anonymous along with its IP address. If the camera is not found, check connections first and then look into router settings (DHCP and Filter by MAC Address are good places to check). Occasionally your firewall settings may block the camera as well.
- Right click on the camera and you will see basic properties, network configurations and a few other utilities. You can indeed change a few camera settings here but I’d rather go to a web browser and do everything in one place.
- Double click on the IP address to start your browser (or type the IP address directly into the browser’s address bar).
- The web interface offers two log-in options: If you use Internet Explorer (IE), choose the ActiveX Mode. If you use Chrome, Firefox or Safari, choose the Server Push Mode. This is important. I use Google Chrome so the following are all based on the Server Push Mode.
- The factory default user name is admin, and there is no password. So you definitely want to change the user settings once logged in!!!
- The first screen after logging in is Device Status. Click on Live Video and you should see a live feed from the camera. For IE users, you may have to download ActiveX Control for the camera to work.
- Go to Device Management and change basic configuration settings. Don’t forget to submit or save after each modification. Sometimes the camera may have to reboot for the new setting to take effect; don’t unplug the power cord when the camera is restarting.
- Change the Alias “Anonymous” to something easier to remember.
- Change the Date and Time. You can also select Sync with NTP Server or Sync with PC Time, and choose Daylight Saving Time if it is applicable.
- Go to Users Settings to change the default user. Choose a new user name and a strong password, and make sure the role is set to Administrator. You can also add additional users as Visitors or Operators, but it is optional. You must have at least one administrator.
- If you use IE browser, you can add multiple cameras here and will be able to monitor up to nine cameras at the same time. Since I use Chrome, I’ll do this using other software or a mobile app.
- Move on to Basic Network Settings. First uncheck “Obtain IP from DHCP Server.”
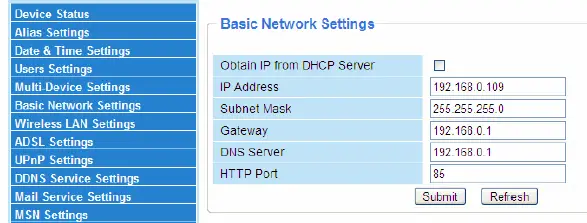
- Since I have several cameras to install, I would like to assign a block of static IP addresses just for home security use. So I manually changed the camera’s IP Address here.
- Then go to your computer’s Control Panel, Network Connections, Local Area Connections, Support, Details. You will see a list of network settings. Copy the Subnet Mask, Gateway and DNS Server addresses to the camera settings. If you don’t see a DNS Server, just use the Default Gateway information. (Alternatively you can go to a command window and type “ipconfig” to get all the IP addresses)
- Change the Http Port to something different than 80, such as 8000. All the cameras use 80 as the default port, so you definitely want to change this (and don’t use ports such as 21 and 25 which are reserved for other purposes). If you have multiple cameras, you can assign them 8000, 8010, 8020, etc.
- If the IP address and/or port number is changed, the new address must be used to access the camera after a reboot. For example, you need to type the address plus the port number (such as http://192.168.0.109:8000) to get back to your configuration page.
- This completes the basic configuration process. Keep in mind that your camera’s IP is still a LAN (Local Area Network) address, and can only be accessed from within your home. You can’t, for example, view your camera with your smartphone’s cellular connection. Not yet, that is.
Setting up WiFi connection, motion detection and remote access from the internet will be discussed in more details later on. Other configurations are either not necessary or not applicable in my case, so they are left disabled (unchecked). For example, ADSL Settings are for internet connections directly through an ADSL modem (without a home router). UpnP is used for Port Forwarding, but it is much better to leave that task to the router. DDNS is necessary for remote access, but the router can handle it as well.
- Section 1: Overview
- Section 2: Basic Configurations
- Section 3: Wireless Connection
- Section 4: Motion Alarm
- Section 5: Remote Access
- Section 6: Access from Smartphone
Problems sending email when alarm detection. Works when set to Obtain Ip from DCHP but NOT when static ip address set ie.192.168.x.x:xxxx . I assume the CGN3 modem/router is blocking this somewhere. Any suggestions?
Fred, I would recommend that you try a different static IP address for the camera. I’m guessing there is a conflict with the example you mentioned. Make sure your router doesn’t block the new IP address you’re going to assign to the camera.